Performance Testing Series – Load Test
Introduction
This series of articles will introduce the reader to the arena of Performance Engineering. After my first two blog articles which provided a 35000 feet of what is Performance Engineering is all about, I am sure most of you would be intrigued to understand more about it. This series of articles should help you get started (in case you would want to take a dive) or would act as a refresher to many who are already in to this domain.
This series aims to discuss the testing aspect of Performance Engineering, how it is done, why it is done and what are the key take away points.
Let’s race away by trying to answer the relevant questions
What is a load test and why is it needed?
After the advent of the internet and specifically the dotcom revolution bought the entire world close to being online. Applications which were erstwhile desktop started getting connected via the internet. With extensive development and advancements in the connection technologies, the idea of getting everything online further developed taking the brick and mortar concept of selling to be available on a computer screen.
It further necessitated that many users connect to such a platform and perform their activities. As it was a new concept, a majority of the testing community had no clue as to how to go about it as most of the testing back then was mostly functional and was either manual or automated to some extent.
To test such a requirement, the concept of putting ‘load’ on the system came in to picture and thus the entire concept of load testing.
So, in a gist, a load test is a test which simulates a multi-user activity in a varied real world like conditions. This is needed to understand the behavior of the application in different situations and to obtain critical performance data that can be used to estimate the growth and to size / tune the application / hardware for any future requirements.
How is a load test executed?
This is a flow chart for the steps

Let’s look at the above blocks in details
Step - 1
The first and foremost requirement of a load test is to emulate / simulate a multi user activity covering most (if not everything) of the applications core business logic.
All of this user activity has to be generated by explicit requests via http (for web applications) or by using any other protocol and customized to work in a multi user scenario.
To make this possible there are several well-known tools which are either commercial or freeware. Some of the tools in the industry are LoadRunner, Silk Performer, Webload, Jmeter to name a few and there are many others which might suit the project’s requirements.
Step - 2
The second most important requirement is to know the user load.
This number comes either from the customer who is expecting to support a particular user load based on the design of the application (or) it is an unknown which the Performance Engineer is expected to find which is again based on the hardware that is allocated for the application
With these requirements in hand, the next step is to identify what is to be tested –
Well, you must be thinking ‘it’s the application’. And yes this is correct, but what is to be tested in the application is also important for the present day enterprise class products that encompass a lot of functionality.
So, it’s imperative that the Performance Engineer get the requirements of what is to be tested in the form of navigational use cases which have to be later converted to test scripts. A set of use cases can form a scenario which can be grouped to achieve the test of a particular functionality.
If these use cases are very large in number then they can be prioritized based on the business use cases and can be tested in sequence and can follow a development lead.
Step-3
After the use cases are identified, the next important / major step is to create the test scripts and this is the most time taking process and depends on the complexity of the use case and the need of additional logic that would be required.
Once the test script development completes, it has to be tested / validated in single user / multi user / single iteration / multi iteration cases to verify that all the correlations / parameterizations work as defined to avoid errors during the execution of the actual load test.
Step-4
This is the crux of this entire process which is testing. As the behavior of the scripts / applications would be unknown, sample tests / dry runs might be required which will serve a twofold benefit of script validation and also to verify the applications behavior.
Post the sample tests the engineer can proceed directly with load tests if the load point is known. If it’s an unknown, then a step test would be required. This is sometimes called as a scalability test because it would determine the applications scalability point.
In this test, the user load is increased in steps say 5-10 users at a time and is kept constant for short period say 5-10 minutes. This is continued until there is a large variation either in one of the client side metrics, predominantly the response time (or) any of the server side resources like the CPU. There is no fixed parameter to check but all of the parameters have to be checked to understand the load point or the 'scalability’ level.
After the scalability level is identified, the next step is to run a sufficiently long load test to see if the client side / server side parameters remain stable during the load period. If there is a variation then it would either mean that the load is higher than what can be run on that particular hardware (or) there are further problems which would need investigation.
The load test would be run in a ramp up – stable load – ramp down pattern to give warm up period and cool down period for the application.
All this would be an iterative process and there is no one-shot solution to establish the scalability level and to successfully run a load test. This can become a fairly long process but will eventually provide a ‘baseline’ performance for future comparison.
Step-5
In the test process after the load test, normally an endurance test and / or stress tests are also executed.
Stress tests are usually targeted at breaking the application, so these usually would go to load extent beyond the scalability level. They establish the maximum possible limits that an application can stretch before giving up.
Endurance tests are normally run at the load level used for the load test but are run for an extended period of time say for 24 hours or 48 hours. These expose any issues that are related to the memory which would not show up in regular short load tests.
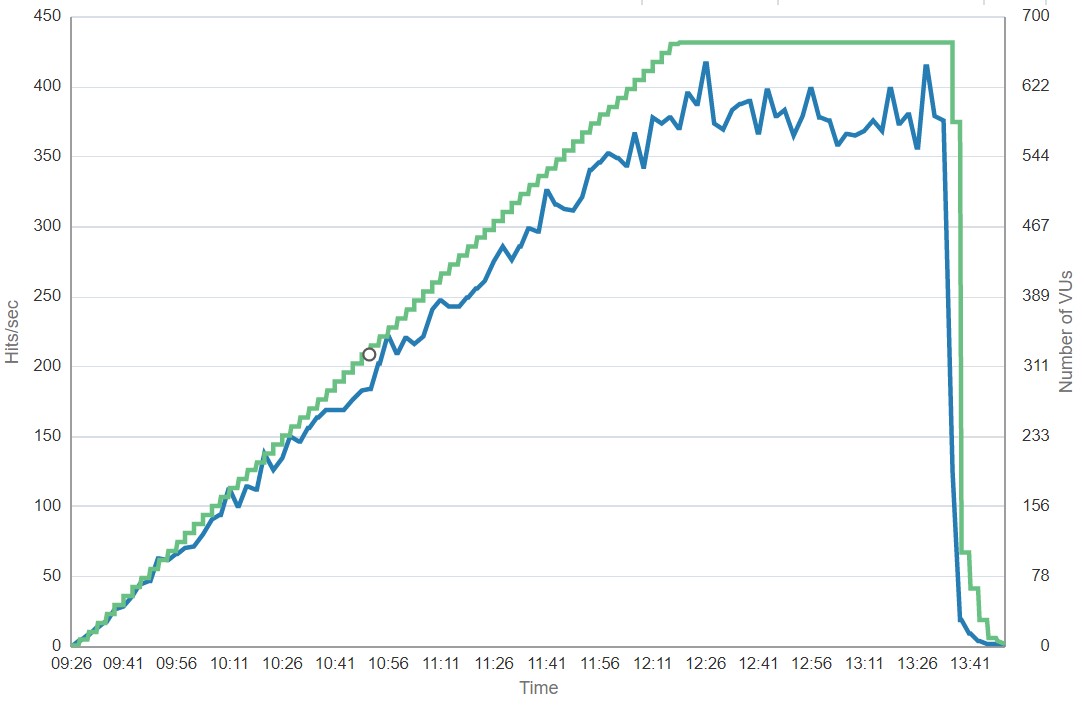
Let us now look at some pictorial examples –
This is a graph from a scalability test which shows the relation between hits/sec and total users. It can be observed that the hits/sec linearly increase up to a certain level after which it suddenly drops and shows a large variation. The point before which it drops can be determined as the scalability level.

Another similar example is the average response time which shows a flat trend up to a certain load beyond which it varies abruptly. This again coincides with the scalability level.

A similar trend can be observed in the server side CPU utilization which drops suddenly beyond a point due to the drop in the amount of load actually hitting the server due to the errors (either HTTP 500 / HTTP 503)